Hello Evocati testers!
Tonight and throughout the weekend we are running a 2nd round of Evocati Playtests for Static Server meshing but now with the Jump Points enabled!
This second build will consist of shards with 2 servers statically meshed with one running Stanton and another running Pyro. You will be able to choose which location to go into and transfer between solar systems using the Stanton and Pyro Jump Points.
Playtest Instructions
Audience: Evocati Only (Under NDA: No Streaming or Sharing of Game Visuals and Audio)
When: Friday and throughout the weekend (Pending any major build issues)
Features: Static Server Meshing (2x DGS), Stanton + Pyro, Jump Points Enabled, Server Crash Recovery
Focus: General Gameplay, Interaction Delay Reproduction (PU Only)
Where: TECH-PREVIEW Channel
Build: 3.22-9099306 (US Servers Only)
We will have a dedicated issue council environment open for reporting issues
Focused Player Count Playtests
We will be running a couple of focused 2 hour playtests this weekend to increase player counts to 200 and then again to 400 the following day if all goes well! Play as normal during these tests as we aren’t looking to stress test.
- Saturday – 200 player cap Playtest: 1-3 PM CST | 1900-2100 UTC
- Sunday – 400 player cap Playtest: 2-4 PM CST | 1900-2100 UTC
Known Issues
- Party jumps are not yet supported.
- The Jump Drive UI is placeholder and may show debug text.
- Jump Point alignment/opening gameplay is placeholder.
- The Jump Point visuals are placeholder.
- It is possible to get stuck in the jump tunnel during solar system transition by exiting your vehicle, this is not intended gameplay and will require a respawn to progress.
- Jump Point ATC is not yet fully functional.
- On exiting a jump point you may be in deep space instead of near the destination jump point.
- Pyro based missions are not currently being offered.
- This release is based on an older version of Pyro, many locations will be incomplete.
- Stanton based missions may be offered while in Pyro but will not be completable if accepted while in Pyro.
- Respawning has been adjusted for this preview, you will respawn in the solar system you died in regardless of the preferred location you have selected.
- While server crash recovery is enabled not all gameplay systems will recover gracefully, please let us know where/if you see issues.
- Outposts and settlement locations on Pyro planets do not have QT markers.
- On entering another system, it may not be possible to use the 3rd person camera view. Exiting and entering the pilot seat will workaround this.
Callouts
As this test is focused on Server Meshing and the technical aspects of the solar system transition, the intended Jump point gameplay and visuals are not present, vehicles will proceed on auto-pilot through the tunnel which consists of placeholder visuals.


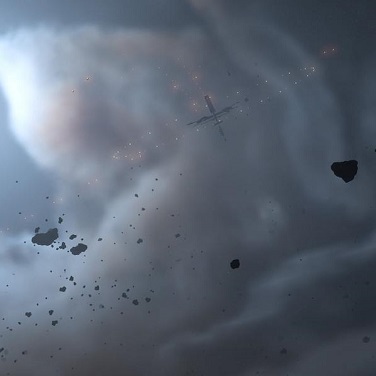
Images showing alignment to Stanton and Pyro Jump Gates
How to use the Jump Points
To perform a Solar System jump via a Jump Point the following four criteria need to be met:
- 1.1. The users ship must have a functioning Jump Drive (this should be all ships that are capable of QT travel)
- 1.2. The users ship must be within range of the Jump Point (currently 15km)
- 1.3. The users ship must have the QT drive toggled on (default keybinding is [ B ])
- 1.4. The users ship must be aligned with the length of the jump tunnel (to a maximum offset of approximately 22 degrees)
For the Stanton -> Pyro Jump Point:
- 2.1. QT towards the “Stanton-Pyro Jump Point” navpoint represented in the star map
- 2.2. QT towards the “Pyro Gateway” navpoint, the user should arrive at the gateway facing the R&R station
- 2.3. With the QT drive enabled, from this position the user should be able to see the “Stanton-Pyro jump point” navpoint at the end of a series of mini-installations and holographic signs (NOTE: The navpoint is not positioned on the Jump Point, only nearby to it)
- 2.4. Approach the Jump Point by following the guiding lights and holographic signs that lead out from the station. This is to ensure the pilot approach’s the jump tunnel with the correct alignment
- 2.5. With the QT drive enabled, approximately 25km away from the Jump Point (not the nav point!) the Jump Drive UI should now appear on the pilots HUD
- 2.6. Continue following the holographic signs warning you about Pyro. The Pilot should be able to see in the Jump Drive HUD that they are correctly aligned with the Jump Point
- 2.7. Once the ship is within 15km the pilot should see all green and the jump drive will start Aligning and then Tuning to the jump point
- 2.8. Once tuning is complete the Jump Drive HUD will move to the ‘Opening Jump Tunnel’ step, during this step the Jump Tunnel should come into view
- 2.9. The Jump Drive HUD should now move to the ‘Entering Jump Tunnel’ step
- 2.10. You may now enter the Jump Tunnel. NOTE: entering the tunnel is on a timer (approx. 30 seconds). If you take too long the Jump Drive will lose connection to the jump tunnel and you’ll have to re-align and re-tune the Jump Drive
- 2.11. Upon entrance to the Tunnel the users ships IFCS autopilot will activate and fly the ship along the length of the Tunnel
- 2.12. Upon exiting the Tunnel the ship will have now arrived in Pyro and the autopilot will release all flight control back to the pilot
For the Pyro -> Stanton Jump Point:
- 3.0. We highly recommend turning on your ships lights (default keybind [ L ]) before attempting the QT towards the Pyro-Stanton Jump Point
- 3.1. QT towards the “Pyro-Stanton Jump Point” navpoint represented in the star map, the user will arrive 18km away from the navpoint
- 3.2. Carefully navigate through the asteroid field towards the “Pyro-Stanton Jump Point” navpoint
- 3.3. With the QT drive enabled, the pilot will see the Jump Drive UI appear on their HUD during the approach
- 3.4. When approximately 7km away from the navpoint the user will see a clearing come into view (Note: approaching too close to the Jump Tunnel, approx. 6km, without following the correct procedure will cause the users ship to be bounced away)
- 3.5. The user should be able to see a series of yellow/orange guiding lights within the clearing, the pilot should fly towards them and use them to help align with the length of the Jump Tunnel
- 3.6. Align the ship with the jump tunnel by aligning it with the “Pyro-Stanton Jump Point” navpoint
- 3.7. If the ship is within 15km the pilot should see all green and the jump drive will start Aligning and then Tuning to the jump point
- 3.8. Once tuning is complete the Jump Drive HUD will move to the ‘Opening Jump Tunnel’ step, during this step the Jump Tunnel should come into view
- 3.9. The Jump Drive HUD should now move to the ‘Entering Jump Tunnel’ step
- 3.10. You may now enter the Jump Tunnel NOTE: entering the tunnel is on a timer (approx. 30 seconds). If you take too long the Jump Drive will lose connection to the jump tunnel and you’ll have to re-align and re-tune the Jump Drive
- 3.11. Upon entrance to the Tunnel the users ships IFCS autopilot will activate and fly the ship along the length of the Tunnel
- 3.12. Upon exiting the Tunnel the ship will have now arrived in Stanton and the autopilot will release all flight control back to the pilot
Additional Notes:
The ATC is currently placeholder and will warn you that you’re attempting to perform an illegal jump. This can be ignored, but you can use the ship MFD, Mobiglass comm tab, or the [ = ] hotkey to request jump permission.
Current Jump Tunnel VFX are placeholder. Once the jump tunnel is open it will only become visible when the user is within approximately 8km of it.